MAY 20, 2017
TAGS
Hie
Writing after a long time. I’m currently doing an internship along with my friend Salman, where I am creating a database web app to view datatables.
One difficulty we faced was, sometimes the number of rows in the table went as high as 5000. So, if you render a html table with such high number of rows, it adds a lot of nodes into DOM tree. The result of this is the page becomes really slow and laggy. We also had searching and sorting to it which made the condition even worse.
So I researched about this issue over the internet and I found a real nice solution for this problem - Infinite Scroll
This solution was one of the few issues talked in the Creating UX that “Just Feels Right” with Progressive Web Apps talk at Google I/O 17.
The solution lets you render tables or list with infinite entries, woah! The key idea of the solution is to render only those entries/rows which are currently in the visible portion of the page. A nice idea! But how?
So the key is to render only those rows which are currently visible, say N visible rows. Now we need to figure out a way to keep these N rows always in the visible portion and chage the row values according to the ones which should be visible at that portion. Wait, what’s going on!
Lets say we have first N rows (ie [1..N]) visible portion. Now when the user scrolls to the part where N+1 row should be visible, we will render rows 2 through N+1 (ie [2..N+1]) in the same N rows and push the N rows down by height of one row. This happens so fast that user doesn’t even feel that he is seeing the same N rows. Yeah, now we can show infinite rows right!

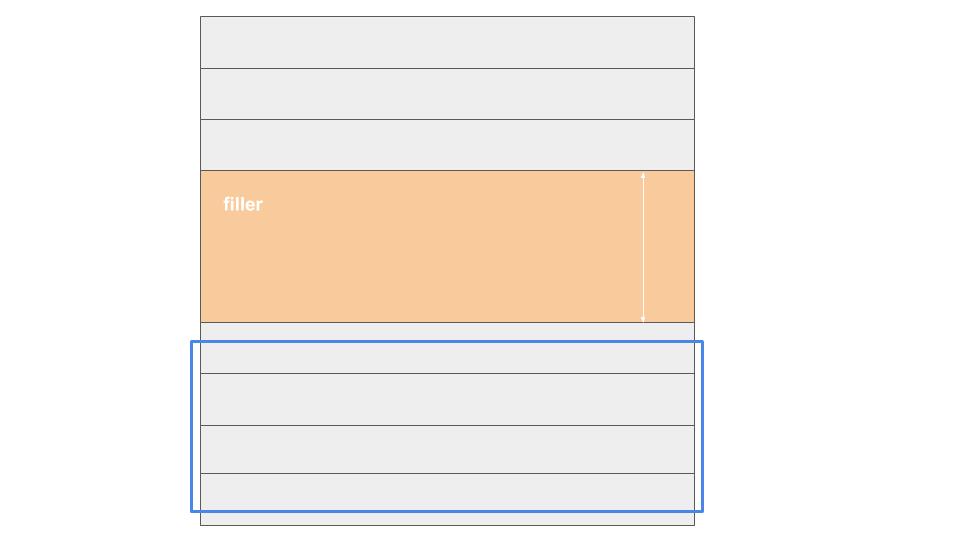
The better approach to this is, having 2*N rows with one filler row after first N rows. Now the job of this filler is to grow as the screen is scrolled so that last N rows are always in the visible portion of the screen.
So, now that we have understood the idea, let’s have a look at the implementation. For a demo, I’m creating a table with Lorem Ipsum texts. First we need to initialize the table, here’s the code:
// Lorem Ipsum List
var lorem = [ "Lorem ipsum", "Dolor sit",...];
// Number of visible
var nVisible = 50,
    rowHeight,
    maxRows = 5000;

/*
 * Function to get row data
 * @param
 *     row - row number
 * @returns
 *     HTML string to the row data
 */
function get_data(row){
	console.log(row);
	var text = lorem[row%100];
	row++;
	html =  '<td><div class="circle-char">' + text.charAt(0) + '</div></td>';
	html += '<td>' + text + '</td>';
	html += '<td>' + row  + '</td>';
	return html;
}

/*
 * Function to initialize table
 */
function tableInit(){
	// Add Initial data
	for(var i=0; i<2*n_visible; i++){
		if(i==n_visible)
			// Filler Row
			$('table tbody').append('<tr id="filler" style="height: 0;"></tr>');
		$('table tbody').append('<tr>' + get_data(i) + '</tr>');
	}
	// Calculate Row height
	rowHeight = $('table tbody tr').outerHeight();
	// Update body height to fit maxRows
	$('body').css('height', (maxRows*rowHeight) + 'px');
}
First we defined the list to be rendered, then the global variables denoting the number of visible rows (N), the row height (useful in setting height of filler), and the max number of rows.
Then we have a helper function to get htmll string of given row index. Then we have the table initialization function, where we render 2*N rows with N’th row as filler with height 0 because initially all 2*N rows are visible . Then we set body height as total number of rows times row height, so that user gets a feel that there are lot of rows.
Now let’s see how to render visible rows given the scrolling position of the screen.
/*
 * Function to draw visible rows
 */
function tableDrawVisible(){
	// Calculate visible row start index
	var offsetTop = $('#filler').offset().top;
	var diff = $(window).scrollTop() - offsetTop;
	var visibleIndex = Math.ceil(diff/rowHeight) - 15;
	if(visibleIndex>=0){
		// Print visible rows
		for(var i=51; i<=101; i++){
			var j = i + visibleIndex;
			$('table tbody tr:nth-child(' + i + ')').html(get_data(j));
		}
		$('#filler').css('height', (visibleIndex*rowHeight) + 'px');
	}
}
First we calculated the index of the first visible row. To do that we need to get top position of filler and the window scroll position, the visible index will be the division of difference betweenn filler top and window scroll with the row height.
Now when we get the index of first visible row, we replace the last N rows with the N rows starting from visible index.
Then we just set the filler height to visibleIndex*rowHeight so that the last N rows are pushed into visible portion. Easy!
Now we need to link the tableDrawVisible() with scrolling event of the window.
// Timer for scroll event trigger
var timer;

// Set OnScroll Listener
$(window).on('scroll', function(){
	if($(window).scrollTop() + $(window).height() >= 35*rowHeight && $(window).scrollTop() < $('body').height() - 35*rowHeight){
		// Clear Scroll Trigger Timer if exists
		clearTimeout(timer);
		// Start Scroll Trigger Timer
		timer = setTimeout(function(){
			tableDrawVisible();
		}, 5)
	}else if($(window).scrollTop() + $(window).height() < 35*rowHeight){
		// Reset Table condition
		$('#filler').css('height',  '0');
		for(var i=51; i<=101; i++){
			$('table tbody tr:nth-child(' + i + ')').html(get_data(i-1));
		}
	}
});
First we defined timer variable (Explanation on it’s way). Then we defined the on scroll listener for window.
When the window goes beyond certain number of rows (threshold), we start timer for the tableDrawVisible() function. The on scroll event is very sensitive and is called even for 1 pixel change in scroll position. To limit number of calls to tableDrawVisible() function, we set a timer of 5 ms. So we are sure that the function is called at maximum every 5 ms. That will render pretty smooth.
And when window is under threshold, we just set the table to the initial condition.
That’s it, we are done…
You can see the demo of the Infinite Scroll below. You can also take a look at the github code.